lights Ram 1500 2013 Get to Know Guide
[x] Cancel search | Manufacturer: RAM, Model Year: 2013, Model line: 1500, Model: Ram 1500 2013Pages: 196, PDF Size: 9.66 MB
Page 3 of 196
INTRODUCTION/WELCOME
WELCOME FROM CHRYSLER
GROUP LLC.................. 3
CONTROLS AT A GLANCE
DRIVER COCKPIT .............. 6
INSTRUMENT CLUSTER .......... 8
GETTING STARTED
KEYFOB ................... 10
KEYLESS ENTER-N-GO™ ......... 11
REMOTE START .............. 13
THEFT ALARM ............... 13
SEATBELT .................. 13
SUPPLEMENTAL RESTRAINT
SYSTEM (SRS) — AIR BAGS ....... 14
CHILD RESTRAINTS ............ 15
FRONT SEATS ................ 20
HEATED/VENTILATED SEATS ....... 22
HEATED STEERING WHEEL ........ 23
TILT STEERING COLUMN ......... 24
OPERATING YOUR VEHICLE
ENGINE BREAK-IN
RECOMMENDATIONS........... 25
TURN SIGNALS/WIPER/WASHER/
HIGH BEAMS LEVER ............ 26
HEADLIGHT SWITCH ............ 27
SPEED CONTROL .............. 28
EIGHT–SPEED AUTOMATIC
TRANSMISSION — IF EQUIPPED .... 29
ELECTRONIC RANGE SELECT (ERS)
OPERATION ................. 30
AIR SUSPENSION SYSTEM ........ 32
MANUAL CLIMATE CONTROLS
WITHOUT TOUCH-SCREEN ........ 34
MANUAL CLIMATE CONTROLS
WITH TOUCH-SCREEN ........... 35
AUTOMATIC CLIMATE CONTROLS
WITH TOUCH-SCREEN ........... 36
PARKSENSE
®REAR PARK ASSIST . . . 37
PARKVIEW®REAR BACK-UP
CAMERA ................... 38
TIRE PRESSURE MONITOR SYSTEM
(TPMS) – 2500 MODELS ONLY ...... 38
POWER SLIDING REAR WINDOW .... 39
POWER SUNROOF ............. 40
WIND BUFFETING ............. 41
ELECTRONICS
YOUR VEHICLE'S SOUND SYSTEM . . . 42
IDENTIFYING YOUR RADIO ........ 44
Uconnect
®Access (AVAILABLE ON
Uconnect®8.4A AND Uconnect®8.4AN)
(IF EQUIPPED) ................ 45
Uconnect
®3.0 ................ 54
Uconnect®5.0 ................ 56 Uconnect
®8.4A ............... 62
Uconnect®8.4AN .............. 79
STEERING WHEEL AUDIO
CONTROLS .................. 97
ELECTRONIC VEHICLE
INFORMATION CENTER (EVIC) ..... 98
PROGRAMMABLE FEATURES ....... 98
UNIVERSAL GARAGE DOOR OPENER
(HomeLink
®) ................ 101
POWER INVERTER ............ 103
POWER OUTLETS ............ 104
OFF-ROAD CAPABILITIES
FOUR WHEEL DRIVE OPERATION . . . 105
UTILITY
TONNEAU COVER............. 108
EASY-OFF TAILGATE ........... 108
PICKUP BOX ................ 109
RAMBOX
®.................. 110
TOWING & PAYLOAD ........... 114
TOW/HAUL MODE ............ 116
INTEGRATED TRAILER BRAKE
MODULE .................. 116
RECREATIONAL TOWING
(BEHIND MOTORHOME, ETC.) ..... 118
DIESEL
DIESEL ENGINE BREAK-IN
RECOMMENDATIONS........... 120
DIESEL ENGINE STARTING
PROCEDURES ............... 120
DIESEL EXHAUST BRAKE
(ENGINE BRAKING) ........... 121
IDLE-UP FEATURE (AUTOMATIC
TRANSMISSION ONLY) ......... 122
ENGINE MOUNTED FUEL
FILTER/WATER SEPARATOR ....... 123
UNDERBODY MOUNTED FUEL
FILTER/WATER SEPARATOR ....... 124
ADDING FUEL – DIESEL ENGINE
ONLY ..................... 125
EXHAUST REGENERATION ....... 125
COOL-DOWN IDLE CHART ........ 127
DIESEL EXHAUST FLUID ........ 127
WHAT TO DO IN EMERGENCIES
ROADSIDE ASSISTANCE......... 130
INSTRUMENT CLUSTER WARNING
LIGHTS ................... 130
IF YOUR ENGINE OVERHEATS ..... 134
JACKING AND TIRE CHANGING .... 135
JUMP-STARTING ............. 148
EMERGENCY TOW HOOKS ....... 150
SHIFT LEVER OVERRIDE ........ 150
TOWING A DISABLED VEHICLE .... 153
FREEING A STUCK VEHICLE ...... 154
EVENT DATA RECORDER (EDR) .... 155
TABLE OF CONTENTS
Page 10 of 196
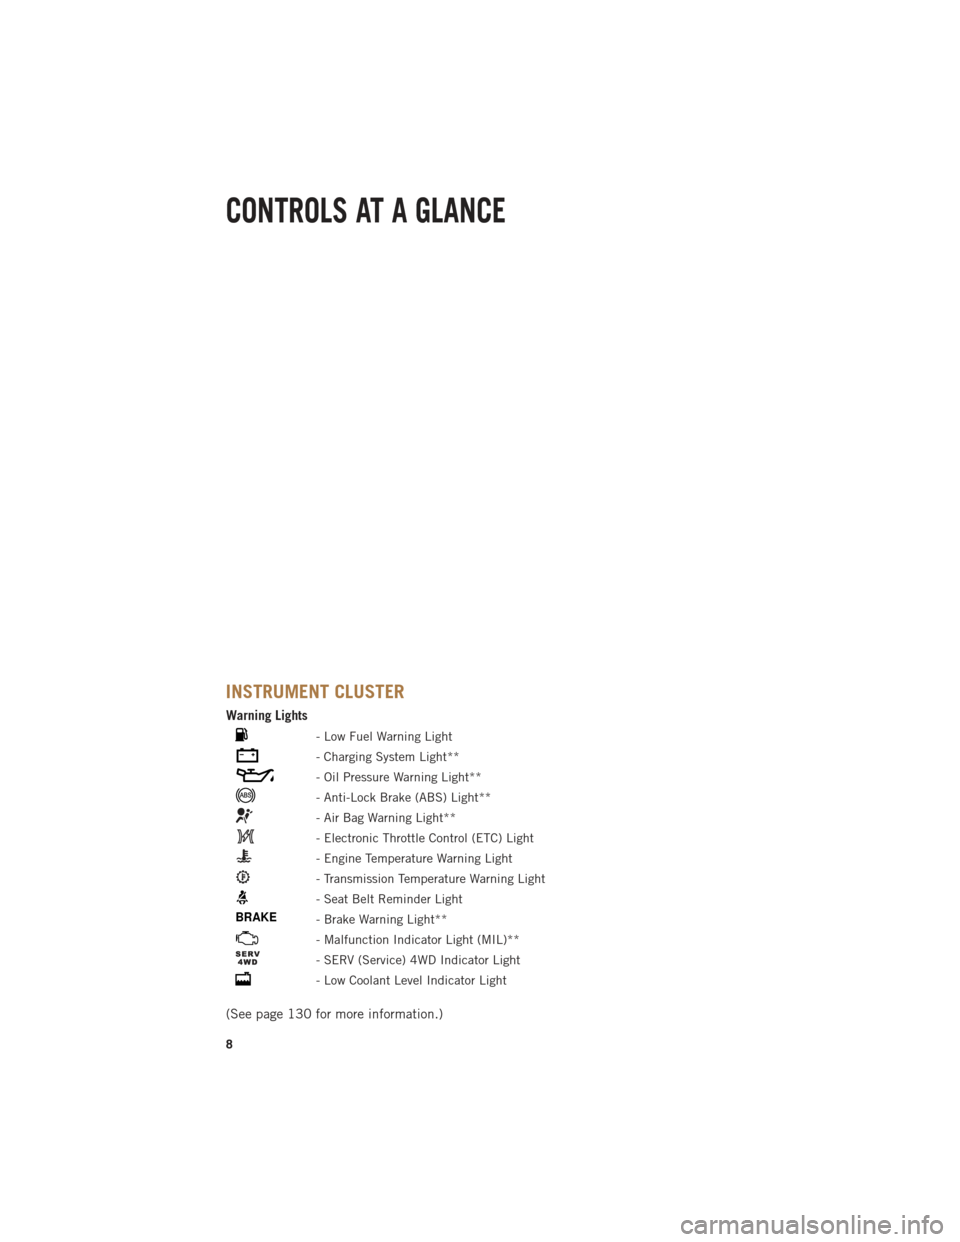
INSTRUMENT CLUSTER
Warning Lights
- Low Fuel Warning Light
- Charging System Light**
- Oil Pressure Warning Light**
- Anti-Lock Brake (ABS) Light**
- Air Bag Warning Light**
- Electronic Throttle Control (ETC) Light
- Engine Temperature Warning Light
- Transmission Temperature Warning Light
- Seat Belt Reminder Light
BRAKE- Brake Warning Light**
- Malfunction Indicator Light (MIL)**
- SERV (Service) 4WD Indicator Light
- Low Coolant Level Indicator Light
(See page 130 for more information.)
CONTROLS AT A GLANCE
8
Page 12 of 196
KEY FOB
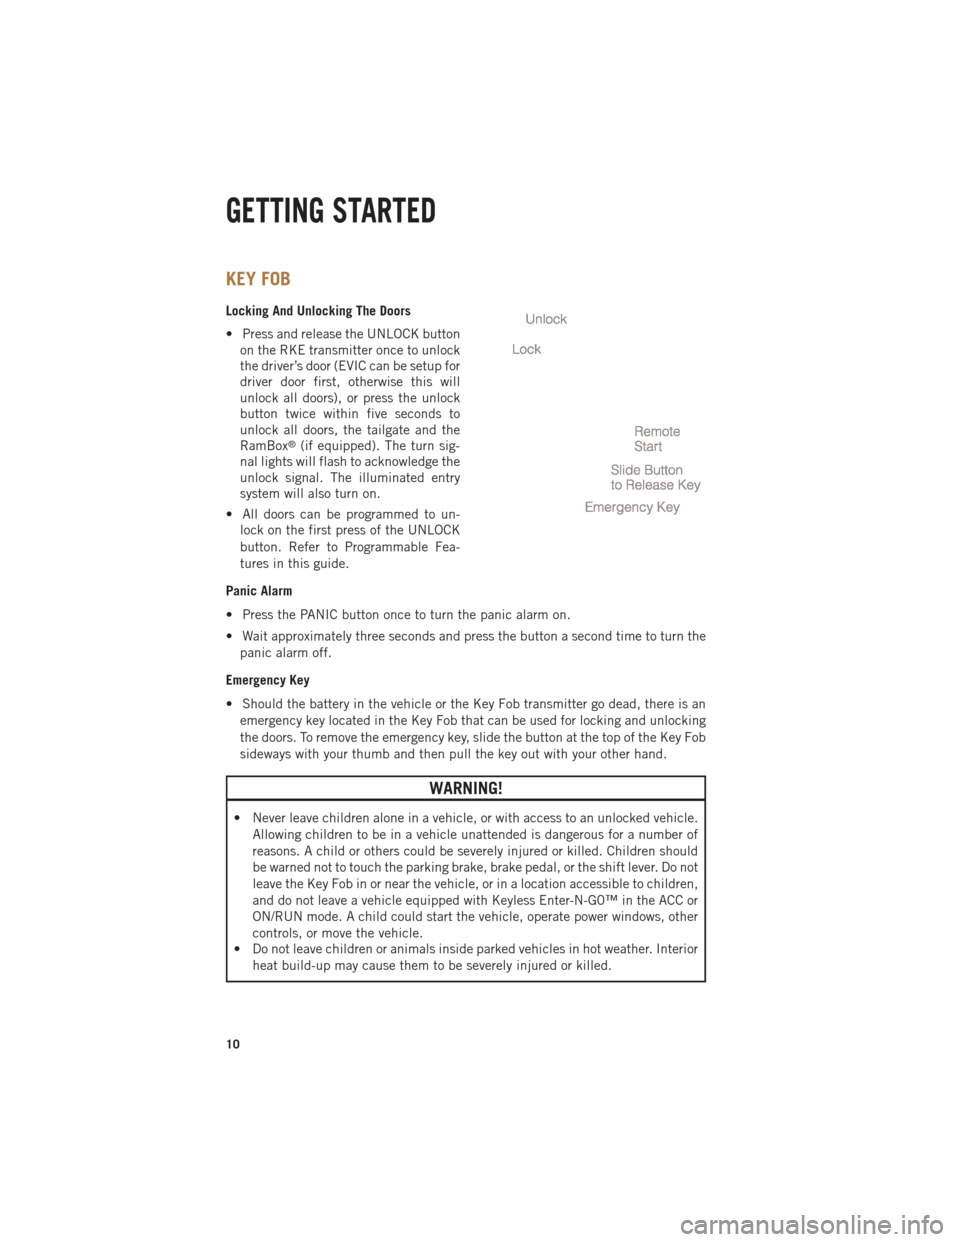
Locking And Unlocking The Doors
• Press and release the UNLOCK buttonon the RKE transmitter once to unlock
the driver’s door (EVIC can be setup for
driver door first, otherwise this will
unlock all doors), or press the unlock
button twice within five seconds to
unlock all doors, the tailgate and the
RamBox
®(if equipped). The turn sig-
nal lights will flash to acknowledge the
unlock signal. The illuminated entry
system will also turn on.
• All doors can be programmed to un- lock on the first press of the UNLOCK
button. Refer to Programmable Fea-
tures in this guide.
Panic Alarm
• Press the PANIC button once to turn the panic alarm on.
• Wait approximately three seconds and press the button a second time to turn the panic alarm off.
Emergency Key
• Should the battery in the vehicle or the Key Fob transmitter go dead, there is an emergency key located in the Key Fob that can be used for locking and unlocking
the doors. To remove the emergency key, slide the button at the top of the Key Fob
sideways with your thumb and then pull the key out with your other hand.
WARNING!
• Never leave children alone in a vehicle, or with access to an unlocked vehicle. Allowing children to be in a vehicle unattended is dangerous for a number of
reasons. A child or others could be severely injured or killed. Children should
be warned not to touch the parking brake, brake pedal, or the shift lever. Do not
leave the Key Fob in or near the vehicle, or in a location accessible to children,
and do not leave a vehicle equipped with Keyless Enter-N-G0™ in the ACC or
ON/RUN mode. A child could start the vehicle, operate power windows, other
controls, or move the vehicle.
• Do not leave children or animals inside parked vehicles in hot weather. Interior
heat build-up may cause them to be severely injured or killed.
GETTING STARTED
10
Page 29 of 196
HEADLIGHT SWITCH
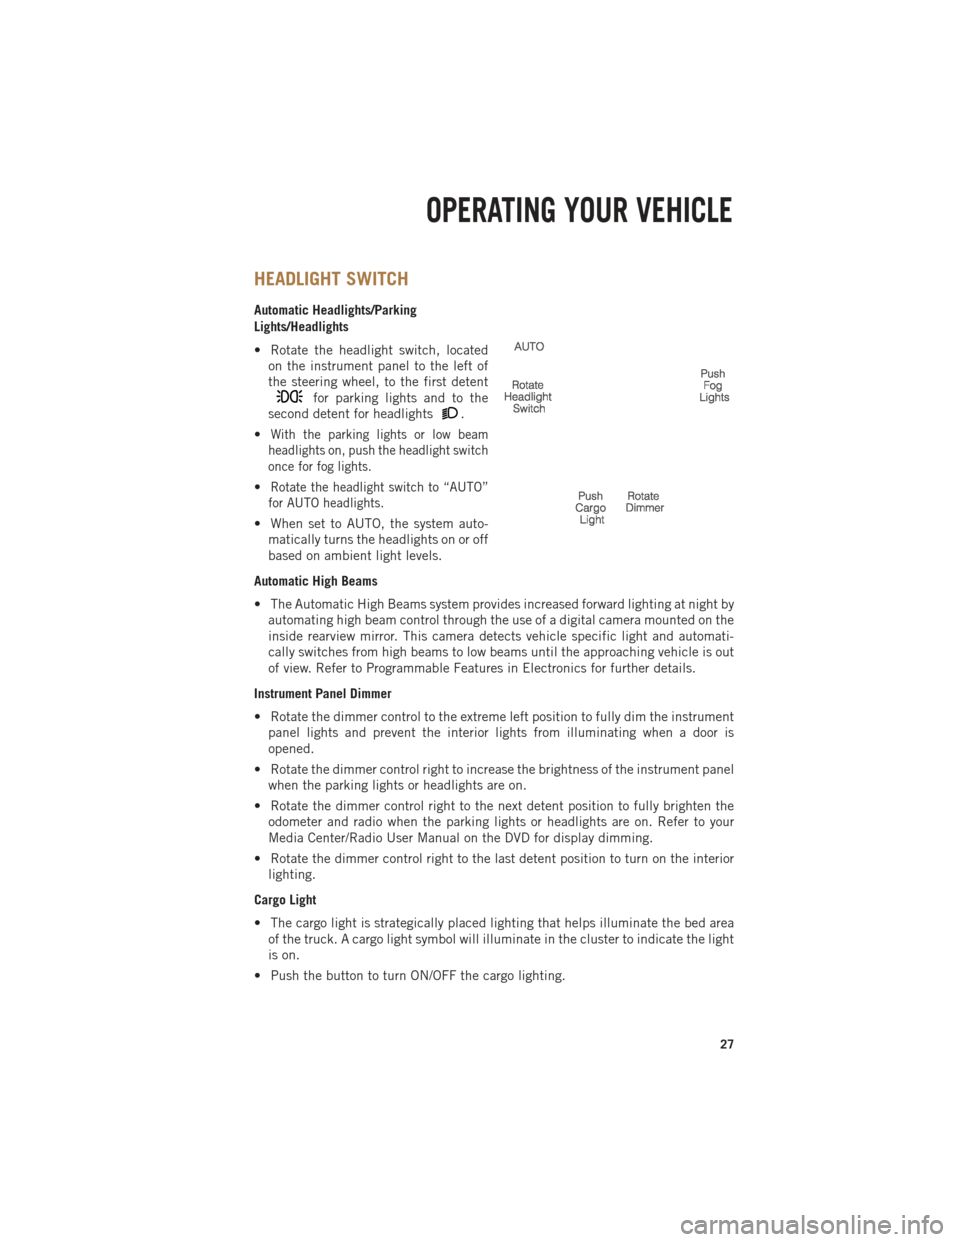
Automatic Headlights/Parking
Lights/Headlights
• Rotate the headlight switch, locatedon the instrument panel to the left of
the steering wheel, to the first detent
for parking lights and to the
second detent for headlights
.
•
With the parking lights or low beam
headlights on, push the headlight switch
once for fog lights.
•Rotate the headlight switch to “AUTO”
for AUTO headlights.
• When set to AUTO, the system auto- matically turns the headlights on or off
based on ambient light levels.
Automatic High Beams
• The Automatic High Beams system provides increased forward lighting at night by automating high beam control through the use of a digital camera mounted on the
inside rearview mirror. This camera detects vehicle specific light and automati-
cally switches from high beams to low beams until the approaching vehicle is out
of view. Refer to Programmable Features in Electronics for further details.
Instrument Panel Dimmer
• Rotate the dimmer control to the extreme left position to fully dim the instrument panel lights and prevent the interior lights from illuminating when a door is
opened.
• Rotate the dimmer control right to increase the brightness of the instrument panel when the parking lights or headlights are on.
• Rotate the dimmer control right to the next detent position to fully brighten the odometer and radio when the parking lights or headlights are on. Refer to your
Media Center/Radio User Manual on the DVD for display dimming.
• Rotate the dimmer control right to the last detent position to turn on the interior lighting.
Cargo Light
• The cargo light is strategically placed lighting that helps illuminate the bed area of the truck. A cargo light symbol will illuminate in the cluster to indicate the light
is on.
• Push the button to turn ON/OFF the cargo lighting.
OPERATING YOUR VEHICLE
27
Page 49 of 196
NOTE:
For security reasons, this link is valid for 24 hours from the time you submit your mail
address into the radio touch screen. If the link has expired, simply re-enter your mail
address into the Uconnect
®Registration App on the radio touch screen to receive
another link.
7. Check for an email from Uconnect
®Access that contains your personalized
registration link. IF you don't see it, check your spam or junk mail folder. Open the
email and click on the link to continue registering.
• The secured registration link will take you through the Uconnect
®Access
registration process step by step.
• To unlock the full potential of Uconnect
®Access in your vehicle, you will need to
create or validate an existing Mopar Owner Connect account (previously Owner
Center). Uconnect
®along with Mopar Owner Connect have joined forces to create
one destination to manage all of your vehicle needs - from managing your
Uconnect
®Access account to tracking service history and finding recommended
accessories for your vehicle. If you already have a Mopar Owner Connect account,
log in to the website with your existing user name and password. For assistance
with this web based registration process, U.S. residents can call Uconnect
®Care
at 855-792-4241.
• At this point your vehicle is registered with Uconnect
®Access. Apps will be
downloaded the next time you start your vehicle. It may take over 30 minutes for
all of the apps to install. If the apps have not appeared after 24 hours, please
contact Uconnect
®Care. The recommended next steps are to:
• Set up your Payment Account. (Provides the option to purchase packages and apps, such as WiFi Hotspot)
• Download the Uconnect
®Access App. (Allows you to utilize the Remote Services
such as Remote Door Unlock)
Download the Uconnect® Access App
• If you own a compatible iOS or Android
®powered device, the Uconnect Access
App allows you to remotely lock or unlock your doors, start your engine or activate
your horn and lights from virtually anywhere (Vehicle must be within the United
States and have network coverage). You can download the App from Mopar Owner
Connect or from the Apple App or Google Play store. For Uconnect
®Phone
customer support and to determine if your device is compatible:
• U.S. residents - visit www.UconnectPhone.com or call 1–877–855–8400
• Canadian residents - call 1–800–465–2001 (English) or 1–800–387–9983 (French)
ELECTRONICS
47
Page 53 of 196
5.Theft Alarm Notification - The Theft Alarm Notification feature notifies you via
E-mail or text message (SMS) when the vehicle’s factory-installed theft alarm
system has been set-off. There are a number of reasons why your alarm may have
been triggered, one of which could be that your vehicle was stolen. If so, please
see the details of the Stolen Vehicle Assistance service below. When you register,
Theft Alarm Notification is automatically set to send you an E-mail at the mail
address you provide should the alarm go off. You may also opt to have a text
message sent to your mobile device.
6. Stolen Vehicle Assistance - If your vehicle is stolen, contact local law enforcement
immediately to file a stolen vehicle report. Once this report has been filed,
Uconnect
®care can help locate your vehicle. The Uconnect®Care agent will ask
for the stolen vehicle report number issued by local law enforcement. Then, using
GPS technology and the built-in wireless connection within your vehicle, the
Uconnect
®Care agent will be able to locate the stolen vehicle and work with law
enforcement to help recover it. (Vehicle must be within the United States, have
network coverage and must be registered with Uconnect
®Access with an active
subscription that includes the applicable feature).
7. WiFi Hotspot - WiFi Hotspot is on-demand WiFi 3G connectivity that's built-in and
ready to go whenever you are. Once your vehicle is registered for Uconnect
®
Access, you can purchase a Wifi Hotspot subscription at the Uconnect®Store.
After you've made your purchase, turn on your signal and connect your devices.
It's never been easier to bring your home or office with you.
• Your vehicle must have a working electrical system in order for any of the in vehicle Uconnect
®features to operate.
Uconnect® Access Remote Features
• If you own a compatible iPhone or Android
®powered device, the Uconnect®
Access App allows you to remotely lock or unlock your doors, start your engine
or activate your horn and lights from virtually anywhere (Vehicle must be within
the United States, have network coverage and must be registered with Uconnect
®
Access with an active subscription that includes the applicable feature). You
can download the App from from the Apple App or Google Play store. Visit
www.UconnectPhone.com to determine if your device is compatible. For
Uconnect
®Phone customer support and to determine if your device is compatible:
U.S. residents - visit www.UconnectPhone.com or call 1–877–855–8400.
1. Remote Start – This feature provides the ability to start the engine on your vehicle,
without the keys and from virtually any distance. You can send a request to your
vehicle in one of two ways:
• Using the Uconnect
®Access App from a compatible smartphone
• From the Mopar Owner Connect website
•
You can also send a command to turn-off an engine that has been remote started.
ELECTRONICS
51
Page 54 of 196
• After 15 minutes if you have not entered your vehicle with the key, the enginewill shut off automatically.
• This remote function requires your vehicle to be equipped with a factory- installed Remote Start system. To use this feature after the Uconnect
®Access
App is downloaded, login with your user name and Uconnect®Security PIN.
• You can set-up notifications for your account to receive an E-mail or text (SMS) message every time a command is sent. Log in to Mopar Owner Connect
(www.MoparOwnerConnect.com) and click on Edit Profile to manage Uconnect
Notifications.
2. Remote Door Lock/Unlock – This feature provides the ability to lock or unlock the
door on your vehicle, without the keys and from virtually any distance. You can
send a request to your vehicle in one of three ways:
• Using the Uconnect
®Access App from a compatible smartphone
• From the Mopar Owner Connect website
• By contacting the Uconnect
®Care on the phone
• To use this feature after the Uconnect
®Access App is downloaded, login using
your user name and Uconnect Security PIN. Touch the App button on your
smartphone with the closed lock icon to lock the door, and touch the open lock
icon to unlock the driver’s door.
• You can set-up notifications for your account to receive an E-mail or text (SMS) message every time a command is sent. Log in to Mopar Owner Connect
(www.MoparOwnerConnect.com) and click on Edit Profile to manage Uconnect
Notifications.
3. Remote Horn and Lights – It’s easy to locate a vehicle in a dark, crowded or noisy
parking area by activating the horn and lights. It may also help if you need to draw
attention to your vehicle for any reason. You can send a request to your vehicle in
one of three ways:
• Using the Uconnect
®Access App from a compatible smartphone
• From the Mopar Owner Connect website
• By contacting the Uconnect
®Care on the phone
• To use this feature after the Uconnect
®Access App is downloaded, login using
your user name and Uconnect®Security PIN. You can set-up notifications for
your account to receive an E-mail or text (SMS) message every time a command
is sent. Log in to Mopar Owner Connect (www.MoparOwnerConnect.com) and
click on Edit Profile to manage Uconnect Notifications.
ELECTRONICS
52
Page 101 of 196
Uconnect® Access Customer Programmable Features
• The Uconnect
®Access system allows you to access Customer Programmable
feature settings such as Display, Clock, Safety/Assistance, Lights, Doors & Locks,
Heated Seats, Engine Off Operation, Compass Settings, Audio, Phone/ Bluetooth
and SiriusXM Setup through soft-keys.
• Touch the More soft-key to on the bottom of the screen, then touch the Settings soft-key to access the Settings screen. When making a selection, scroll up or down
until the preferred setting is highlighted, then press and release the preferred
setting until a check-mark appears next to the setting, showing that setting has
been selected. The following feature settings are available:
• Display • Clock
• Safety / Assistance • Doors & Locks
• Auto-On Comfort & Remote Start • Engine Off Options
• Compass • Audio
• Phone / Bluetooth • SiriusXM Setup
• Lights
EVIC Reconfigurable Screen Setup
• The following settings allow you to change what information is displayed in the instrument cluster as well as the location that information is displayed.
Digital Speedometer
• Press and release the UP or DOWN arrow button until the Digital display icon ishighlighted in the EVIC. Press and release the RIGHT arrow button to change the
display between km/h and mph.
Vehicle Info (Customer Information Features)
• Press and release the UP or DOWN button until the Vehicle Info icon is highlightedin the EVIC. Press and release the RIGHT button and Coolant Temp will be
displayed. Press the UP or DOWN arrow button to scroll through the following
information sub-menus:• Tire Pressure
• Coolant Temperature
Trip A
• Press and release the UP or DOWN arrow button until the Trip A icon is highlighted in the EVIC. Press and release the RIGHT arrow button to display the Trip A
information.
Trip B
• Press and release the UP or DOWN arrow button until the Trip B icon is highlightedin the EVIC. Press and release the RIGHT arrow button to display the Trip B
information.
ELECTRONICS
99
Page 112 of 196
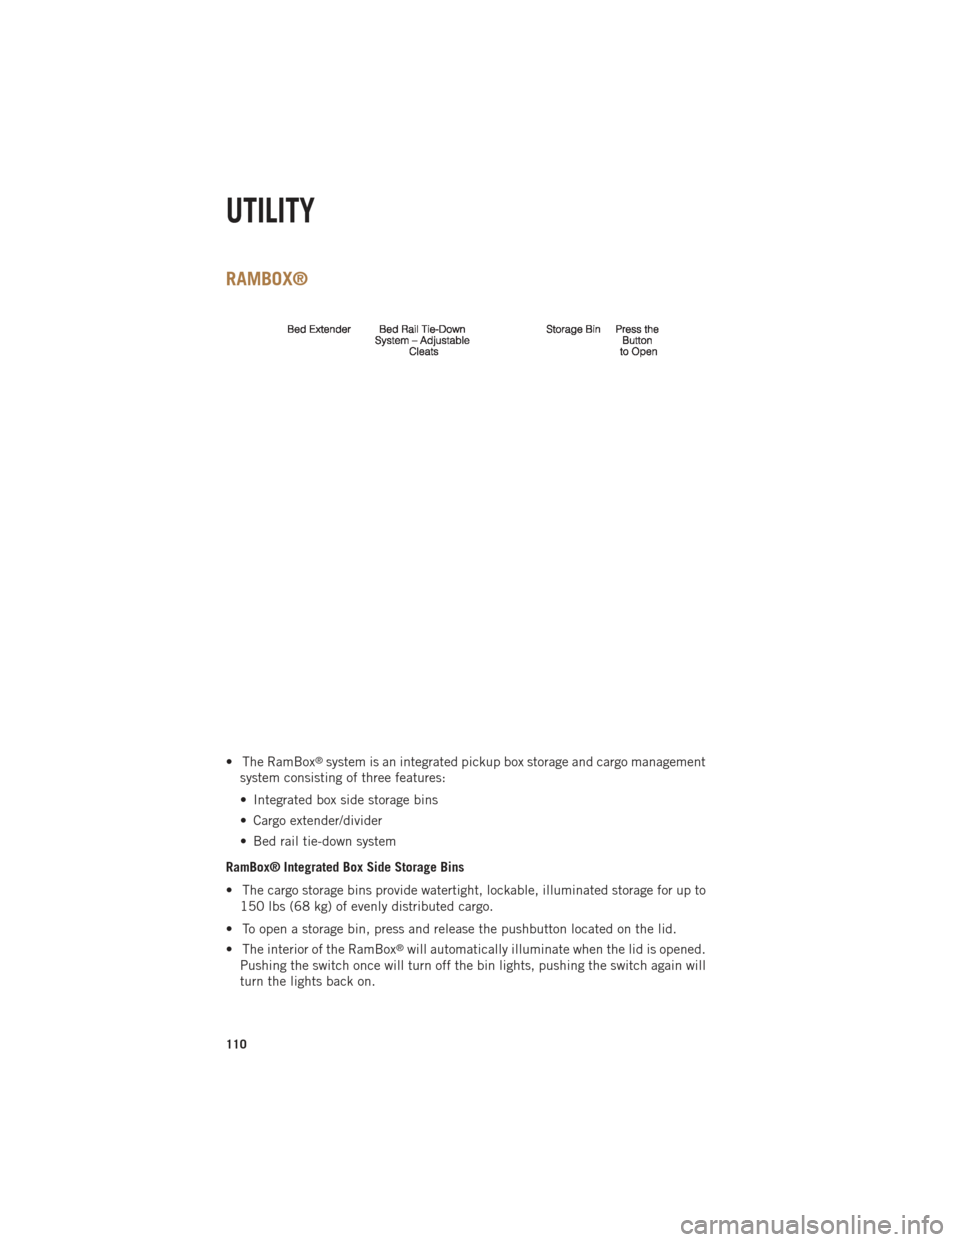
RAMBOX®
• The RamBox®system is an integrated pickup box storage and cargo management
system consisting of three features:
• Integrated box side storage bins
• Cargo extender/divider
• Bed rail tie-down system
RamBox® Integrated Box Side Storage Bins
• The cargo storage bins provide watertight, lockable, illuminated storage for up to 150 lbs (68 kg) of evenly distributed cargo.
• To open a storage bin, press and release the pushbutton located on the lid.
• The interior of the RamBox
®will automatically illuminate when the lid is opened.
Pushing the switch once will turn off the bin lights, pushing the switch again will
turn the lights back on.
UTILITY
110
Page 115 of 196
CAUTION!
• Failure to follow the following items could cause damage to the vehicle:• Assure that all cargo inside the storage bins is properly secured.
• Do not exceed cargo weight rating of 150 lb (68 kg) per bin.
• Leaving the lid open for extended periods of time could cause the vehiclebattery to discharge. If the lid is required to stay open for extended periods
of time, it is recommended that the bin lights be turned off manually using
the on/off switch.
• Ensure cargo bin lids are closed and latched before moving or driving
vehicle.
• Loads applied to the top of the bin lid should be minimized to prevent
damage to the lid and latching/hinging mechanisms.
• Damage to the RamBox
®bin may occur due to heavy/sharp objects placed
in bin that shift due to vehicle motion. In order to minimize potential for
damage, secure all cargo to prevent movement and protect inside surfaces
of bin from heavy/sharp objects with appropriate padding.
• The maximum load per cleat should not exceed 250 lbs (113 kg) and the
angle of the load on each cleat should not exceed 60 degrees above
horizontal, or damage to the cleat or cleat rail may occur.
WARNING!
•Always close the storage bin covers when your vehicle is unattended or in motion.
• Do not allow children to have access to the storage bins. Once in the storagebin, young children may not be able to escape. If trapped in the storage bin,
children can die from suffocation or heat stroke.
• In a collision, serious injury could result if the storage bin covers are not
properly latched.
• Do not use a storage bin latch as a tie down.
• To reduce the risk of potential injury or property damage:
• Cargo must be secured.
• Do not exceed cargo load rating of your vehicle.
• Secure all loads to truck utilizing cargo tie-downs.
• Extender should not be used as cargo tie-down.
•
When vehicle is in motion do not exceed 150 lbs (68 kg) load on the tailgate.
• The bed extender is not intended for off road use.
•
When not in use, the extender/divider should be in stowed or divider position
with the tailgate closed.
• When in use, all handles are to be in the locked position.
UTILITY
113